Wednesday, November 30, 2011

"It's begining to look alot like Christmas..." DIY felt mistletoe

I saw this yesterday on pintrest and immediately drove to Micheal's to pick up the supplies i needed to make it.  I love mistletoe but my cat loves to eat everything! I am always worried she will get a hold of the mistletoe and get sick so this project is the perfect solution.  Plus it will be perfect to pack away and use every year instead of searching for mistletoe each year like I have to do right now. 


(thanks Green wedding shoes (I LOVE your blog!!!)


I got 2 sheets of green felt, 1 pack of 25 green chenille pipe cleaners and a roll of pretty 1.5" ribbon.  I had some pretty red satin at home that I wanted to use for the bow.  

First you need the template from  http://greenweddingshoes.com/diy-felt-mistletoe/ (check out her blog, lots of great stuff!!)

I cut out one of each template, just didn't have the patience to cut out more branches.....then cut pieces of the chenille stems to fit all the way down the backs of each piece.  Hot glue the chenille stems to the felt cutouts.


                                                 Here's all the pieces (branches) cut out


and the chenille stems glued to the felt


Next I cut a 12" piece of the 1.5" ribbon, folded in half and slid a small rubber band on the the cut ends. 


Then slide the felt pieces one at a time under the rubber band, in front of the ribbon.


Cut a 20" piece of the red satin and tie a bow on top of the rubber band so you can't see it.  Then bend the branches so they look more natural and your done! 


One piece of felt was plenty to make 2 bunches and I only used 3 or 4 of the chenille stems.  Looks like I will be making a few more of these......


Wednesday, October 19, 2011

Double, Double, Toil and Trouble...a handmade witches hat

So I have been trying to figure out what to be for Halloween for a few weeks now.  Every year its the same thing. "I don't think I'm going to dress up this year...to much money...don't know what to be..." and then right before Halloween I decide that I LOVE dressing up and have to find something to be.  This year I decided on a witch.  Cute, easy and I know I have something in the closet that I can use for a costume. So all I really need is a witches hat.  I am not a fan of the hats at the costume stores, mostly because everyone has them so I decided to make my own.  I browsed the web and pintrest (of course!!) for ideas and stumbled across a mini witches hat on a headband.  SO fun! Small so it won't be in the way all day and stylish!  So i headed to Joann's and picked up 2 pieces of black glitter felt (one starched and one not) and some hot pink feathers.  While I was shopping I noticed that all the Halloween stuff was on sale and picked up some hot pink and black striped tights.  Checked out and only spent $6 on tights and my hat! that's such a great deal!! (I did have a headband at home already)  So hear it is....not attached to the headband yet. 


Here are the templates I used to make it.  I am sorry I don't know how to make it so you can down load them but this gives you an idea.  I cut the cone out of the soft felt and the brim out of the starched felt.  I didn't want a floppy brim on my hat. 


Tuesday, September 27, 2011

busy.. busy... busy..... and some really great bread

So I have been super busy the last week or so since my last post, sorry everyone.  We threw the fisherman party (I promise a post with decorations and cupcakes to come later)  and have been doing allot of work around the house.  Over the weekend my husband and I had a few people over to watch the UFC fight.  I had planned a night out with one of my best girls so I decided to whip up some crock pot white bean chicken chili for everyone so they didn't have to order pizza.  I used a recipe from Perfect recipes for having people over by Pam Anderson.  I changed a few things, here's a copy of the recipe. 


I used chicken breast, since that's what I had and just threw all the ingredient's into the crock pot (skipped cooking the onions and spices).  I used hominy and white beans and did not blend the hominy and broth (I think I would do this next time though).  Everyone loved it!  We had green onions, limes, cheddar and sour cream for topping.  YUM!!!  I had some leftovers for dinner last night and it really did turn out good. 


 I love this cook book! and have made quite a few recipes from it.  It has beautiful pictures and lots of tips on how to make stuff for big groups, things you can do ahead of time, etc.  If you get a chance check it out.  


I also decided last minute that I wanted to make something sweet.  I have been holding on to this recipe for cinnamon pull apart bread that is so beautiful I had to try it.  So Saturday morning after the chili was in the crock pot I made this recipe from Joy the baker.


I cheated and used Bridgeford frozen dough (the loaf kind).  Just threw it under a towel and let it rise and then followed all the other steps.  It turned out amazing!! and oh soooo pretty.  Here it is.....


This was a hit with the husband and the friends that got to try it (the husband ate most of it).  When I woke up Sunday all that was left was so sticky Cinnamon and sugar goo on the platter....the guys destroyed the rest after I crawled into bed.  hahaa!!! You MUST try this.  When I make it again I will make the dough from scratch, but it is so much easier to use the already made kind. 


Monday, September 12, 2011

Fisherman BIrthday Party- Decorations and Crafts

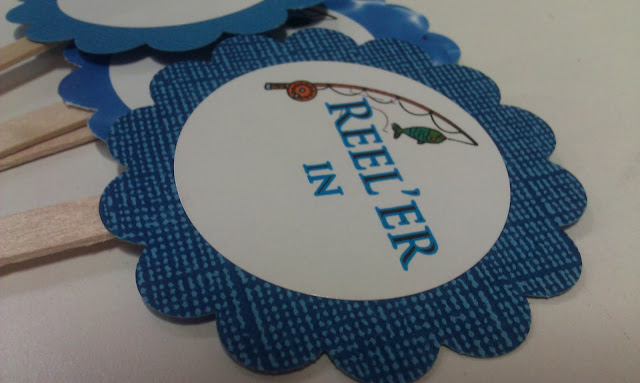
So I started to work on decorations and crafts for the fisherman's birthday party last week after I decided what I really wanted to make and what I didn't really need.  I loved the cupcake toppers and had all the stuff in my craft area so I went to town ;)  First I designed and printed some round stickers.  I use Adobe CS3 illustrator for EVERYTHING.  I love this program and am glad I have taken classes on how to use it cause there is allot to it.  I used my Scallop Circle Punch to cut out scrapbook paper in blue and green and then just stuck the stickers to the paper.  My paper is colored on both sides and is pretty thick like card stock so my cupcake toppers aren't floppy.  I taped the scallop paper to a coffee stir stick and Ta-Da! Cupcake toppers!


I even had some paper that had a water design on it :) to bad you can't really see it........


I love these ones with the fish on them!

I made 4 of each topper and I am also going to make some cupcakes with the blue frosting, goldfish crackers and mini pretzel fishing poles like I posted in my last post.  I love them but they look like allot of work so I am only going to make a few. 


I also made some paper bag boats.  I am going to fill these with gold fish crackers and maybe some gummy worms.  If you have never folded a paper boat it's super easy! and they are so cute. You can find direction's if you google "how to fold a paper boat".  I have made these for valentines day before, with heart doilies as sails.  Love boats :) just filled them with valentines day candy.  I used pretty red and pink paper.  This time I wanted them to look more "rustic" and love the way they turned out with the paper bag paper.  I decided against making sails since he is a bass fisherman and his boat does not have a sail.  Here's a picture. 


Thursday, September 8, 2011

The Fisherman's birthday party

So the good friend I was talking about in my last post is having a birthday party and I volunteered (more like begged) his beautiful girl friend to let me help with decorations.  She is currently in school so she only has time for studying. She gladly gave me the job.  Woo-Hoo!  The man who loves trains also is a big time BASS fisherman!  so Fisherman party it is!! I have never thrown a fish themed party and have been spending lots of time searching the web for ideas.  So far this is what I have found that I like and want to try to incorporate.....


This room full of waves and fish is soooo cool!!!  I never would have thought of doing this.  I know the dollar tree by me has streamers 2pk for $1 and big packs of balloons. I hope they have blue......

Picture from http://craigandwhitney.blogspot.com/2010/01/taggs-fishy-party-invitations.html


I love these cupcakes! I will be making little cupcake tag thingies like the top ones and maybe some with bass on them.  The bait bucket cupcake wrappers are amazing....not sure if I have the energy to make these though...... This blog also has a cute pendant banner and I think I will make one. 


 Defiantly going to make some blue frosted cupcakes with fishing poles and gold fish! What a great idea. Thanks to: http://yellowfence.blogspot.com/2011/03/fishing-cupcakes.html

Ok I will be posting pictures of the projects in a few days......

Stay tuned :)

Wednesday, August 31, 2011

Planes, Trains and....... BIRTHDAY'S!

My good friends birthday is in a few weeks (if you know him please do not ruin the surprise)  and he loves fishing, prospecting, camping, riding his quad, Selena (his beautiful, wonderful, crafty girlfriend) and TRAINS!!!! Earlier this year we hiked to The "Impossible" Goat Canyon Trestle, it was a adventure we will never forget. 


(You can see the trestle in the background)


One of the most amazing things I have ever seen and worth every scratch and bruise.    Here's a link if you want to know more about it.  It was a 14 hour hike from beginning to end (so not for the faint of heart). 

http://www.roadtripamerica.com/places/deanza.htm 

During our adventure I found out that my good Friend has a secret love for trains, well a secret from me at least! hahaa!  So this year when deciding on what would be a great birthday gift for him, I remembered that in our area we have the Pacific Southwest Railway Museum (the trains from this station used to go over the trestle we hiked to, i think).  So after some contemplating I decided to get him tickets to the museum and a 60 minute ride on one of the trains.  I did a quick web search and found a Groupon for 2 tickets for the price of one (if you haven't checked out Groupon you must!!! they have the best deals).  Which means I HAD to buy 2 Groupon's so we could join our friend and the beautiful Selena on this fun little adventure. 

So Groupon's are not pretty, just a coupon you print from an email.  I just couldn't give his a ugly piece of paper for his birthday! so I made some vintage looking train tickets in adobe illustrator cs3.  It was really fun looking around online for ideas and then putting it all together.  I am very happy with the way they turned out.  Still want to take some brown stamp ink and make them look kinda dirty and old. OK, OK, I know you want to see some pictures...here you go........


Here's the tickets


A close up of the train and ticket number (its his birthday!) 


                                                           this is the tear off end piece

Ahhh.....I am sooo very happy with these, can't wait to give them to him.  I am going to make a card and slide these inside.  


Monday, August 29, 2011

Fondue and friends.......

So Saturday we had a few Friends over for football and fights.  I planned on cheating and ordering pizza (just didn't feel like making a bunch of food for everyone) but then I started to feel bad and decided to make homemade Stecca (a no knead baguette) and pesto fondue.  My poor fondue pot sits in the cabinet and collects dust, I just don't use it much.  So far I have tried one kind of cheese fondue that no one really liked and chocolate fondue for a few showers and once for Valentine's day at the desert.  I searched the web Friday for a fondue recipe that used things I already had in my kitchen and stumbled upon fat girl trapped in a skinny body's blog.  I got a recipe from a friend for homemade pesto and always have some in my freezer.  I thought how perfect! use up all that cheese I bought for homemade pizza's and get to eat pesto!  Here's the recipe:

 http://fatgirltrappedinaskinnybody.blogspot.com/2010/06/2010-fifa-world-cup-italy-and.html

It was amazing!!!! Sooooooo good and everyone loved it. My fondue pot will be coming out more often!

I also made the no knead baguette the fatgirl talks about and it was amazing!  So easy and yummy.  I "baked" mine on the BBQ since it was crazy hot this weekend.  Baking on the BBQ was a new experience and for my first time I think it went pretty well.  I have made homemade pizza crust on the grill before and knew that the bread would have a wonderful smoky taste, and it did!  Next time I might cook it on the little rack at the top of the grill so the top gets golden.....The bottom of the loaves were perfect, the texture was good (lots of air holes in the bread) but the top just didn't get brown like I wanted it to.  When it cools down I will be making this bread in the oven all the time!  Would make good sandwiches I think......

You will not be sorry if you try this!

Monday, August 22, 2011

Fall Paper Leaves Wreath

So craft day was a success!  Well for me at least ;) hahaa! I finished my wreath, well I still need to decide how to hang it (or where to hang it) but I am happy with the leaves and roses.  I am going to bring it to Micheal's to try to decide what kind of ribbon I want to hang it with.  I bought a paper mache letter like these:

http://www.joann.com/joann/catalog/productdetail.jsp?PRODID=xprd78870&green=1026755182

and will be hanging it in the middle of my wreath.  I spent allot of time trying to decide what I wanted to do with the letter, paint or decoupage?  I have decided to leave it the way it is, I really like the Kraft color.  It really pops in the middle of my colorful wreath.  I even have a little mushroom bird to sit on the top.  I will post pictures later when I decide how to hang the wreath and how to attach the letter in the middle.  Why are there so many options?  


OK so here it is!  Sorry about the picture, I just leaned it up against the wall for these. 


You can't really tell, but I used glitter paper, shinny gold and copper and a few that have a texture.  The roses are made out of felt.  I love the way it all comes together!  all those fun textures and colors! 


Thursday, August 18, 2011

Crafts and cocktails day #2

So it is finally time for our second crafts and cocktails day.  It has been way to long since our first one but life just caught me up and didn't want to let me think about craft day's.  I have had a busy summer.......So our second project is a wreath for the fall.  I figured we could spend a few craft days working on it (just a excuse to get the girls together for cocktails and gossip) hahaa!

Here's the invite:


I am making the grape vine wreath with colored leaves and felt flowers.  I found the idea on Etsy.com

http://pinterest.com/pin/97143167/


The felt flowers will be made the same way I made the paper flowers for this project.....

http://craftywelderchick.blogspot.com/2011/06/spring-paper-flower-topiary.html

Nice, easy and Ohhhh so pretty!

Pictures of the wreaths to come. 


Monday, August 15, 2011

Maternity Photography 27 weeks

I love pregnant women! There is just something about carrying a baby (or two) that really makes a woman glow.  In my eyes there is no one as beautiful as a mommy to be.  A few weeks ago I shot some maternity photo's for my good friend who is having twins (one boy and one girl).  Thought I would share a few of my favorites.  


Friday, August 12, 2011

Christmas in July!

Well more like Christmas cards in August, but I couldn't help myself.  I LOVE Christmas!!!! I love everything about the whole season! So when my friend suggested that it was time to start making Christmas cards I just about cried with excitement.  She has this magical craft room full of all kinds of toys.  Papers and Ribbons and Stamps...oh my!!! haha!  She has been working on her cards for a while now (just 5 or so a week) and had them all laid out so I could check them out and decide what I wanted to start with.  I love green, (its my favorite color) so I started with this beautiful majestic reindeer on a green card. 


We stamped the medallion stamp from stampin' up then stamped the reindeer and mounted all the rectangles of paper.  Next I embossed the "Merry Christmas" in cherry cobbler with glitter and sprayed it with a wonderful shimmer.  I am in love with this card! Not sure if I will be able to part with it.......


Here is a close up of the glitter embossed "Merry Christmas"


and the beautiful shimmer. This makes my heart happy.  We need more shimmer in our lives.  


I loved the card in the green but decided to try it in Bravo Burgundy and Cherry Cobbler too!  I love the names of the colors that Stampin' Up uses.  Makes me kinda hungry...... Well here is the other one I made. 


and the card with the stamped enevelope


I made 6 of the majestic reindeer cards (my new name for them) and then started on the fun "reindeer march in the snow" cards.  Still working on the name.......  Here it is!


Pretty marching Reindeer with a cool post mark stamp.  Cherry cobbler paper for the card, crumb cake then Baja breeze with the snowflakes...I wanted to pick my colors by the best names! The reindeer are stamped in the cherry cobbler then everything was sprayed with a glitter spray. 


We used an embossing folder die (i think that's what it is) in the big shot to make the snowflakes in the Baja breeze paper. 


and here is the card with the envelope!


I really can't wait for Christmas card making day 2! 

Check Out Stampin' Up. They have some really cool stuff. 


Monday, August 8, 2011

TWINS!!!!!!!

One of my good friends is having twins!!!!! YEA!!!! I am a twin and this is the first person I know that has twins so I am super excited! I immediately started looking at cute things to make for twins, a boy and a girl!  I found a few onesies that I loved and started planning.  My favorite were "Twins rock" and "Twins roll".  I went to Micheal's and picked up some iron on letters, Kohl's for some long sleeve onesies and Joann's for some fabric and Heat & Bond.  If you haven't ever used heat and bond you must try it out!  this is what it looks like:


I used the Ultra hold, but you can use the lite and cut it with your Cricut (I will be trying this soon!)  I wanted to have a little guitar on the front and a heart on the butt of the onesies.  All you have to do is trace your pattern with pencil on the paper side of the heat and bond, cut it out (not on the lines, leave some room) and iron it on to the back of your fabric.  Then when it cools down you cut along your pencil lines, peel of the paper backing and iron your shape onto your onesie.  Here are the guitar's and heart.  I used pink zebra fabric for the girl and flame fabric for the boy. 


Then I used the iron on letters I bought and spelt out "twins rock" and "twins roll" on the front. 


This was super easy to make and the mom to be loved them!  The onesies I found online were almost $30 a piece and I made these for under $10 each.  I can't wait to see the babies in them. 

Here's the back....